Jekyll on Windows
11 Jan 2015
Jekyll is a simple blog-aware static website generator written in Ruby in which you can author your content in Markdown and host your site in GitHub Pages.
Windows is the operating system tour de force.
Whoa! That’s great Tod but you’re way ahead of yourself as is usual for you…
So maybe I got a little ahead of myself there so let’s go back to the beginning.
If you like you can jump straight to the installation guide.
History
I’ve been telling myself for the better part of ten years that I need to have a blog. Why? Because all the cool kids are doing it (and have been for ten years now).
I told myself “Tod, you absolutely must!”.

And I might have something interesting to say one day and nowhere to say it.
Selecting a Blogging Engine
I spend a lot of my time giving free (and paid) advice to people on how to build software. One maxim I find myself coming back to repeatedly is:
List your requirements in order of priority and then draw a line under the Minimum Viable Product. Once you know what your MVP is plan the most pragmatic solution you can while keeping in mind the things under the line.
So because I know I should dog food my own advice here are my requirements.
-
Must generate a static site.
I don’t see the point in hosting a web application for a static site. -
Must be able to host for free.
What can I say? I’m a cheapskate! -
Must allow me to design (or modify) my own theme.
I’m a web developer (after all) so I want to be able to show what I can do. -
Must be able to “backup” and “track changes” to posts.
I’d really hate to loose anything and I want to be able to revert back. -
Must provide feed-software integration.
I want to increase the likelihood that people might read what I have to say. -
Must provide social media integration.
I want to level up my personal brand and trigger discussions. -
Must be able to forward-date posts for future release.
I want to be able to release on a regular schedule.
Options Considered
Based on this list and considering my technological comfort and appetite for disruption (which you should always do) here is a list of some of the blogging engines I considered.
-
Ghost built on Node.js the result of a Kickstarter I was watching. It has a great WYSIWYG blog authoring tool which is compelling. You can host yourself “for free” or you can pay for SaaS hosting.
-
Medium a blog-publishing platform that blurs the lines between regular blogging and social journalism.
-
Sandra.Snow a Jekyll-inspired static site generation tool which comes recommended by my colleague Filip Ekberg.
In the end (as you already know) I selected Jekyll and here’s why:
-
Must generate a static site.
It’s designed to generate a static site. -
Must be able to host for free.
You can host for free on GitHub Pages. -
Must allow me to design (or modify) my own theme.
There are themes that you can easily modify to suit your requirements. -
Must be able to “backup” and “track changes” to posts.
Everything required to generate the static pages is plain text (no databases) and it is simple to commit to a Git repository and push that to GitHub. -
Must provide feed-software integration.
Generates anatom.xmlfile in the root directory conforming to the Atom Syndication Format which is a good choice for syndicating your blog to readers. -
Must provide social media integration.
I found a simple guide to Twitter and Disqus integration here and Jekyll has plugins that extend it’s functionality in interesting ways. -
Must be able to forward-date posts for future release.
Jekyll has the concept of working with drafts and you can forward-date posts using Git branches and just merge them when you want to release a new post.
So all is well regarding the requirements. Next step: get it going on Windows.
Installing Prerequisites
There are quite a few prerequisites required to get to the point where we can install Jekyll, so here is my by the seat of your pants guide to installing all the prerequisites. I assume a reasonable proficiency with computers here so if you get into trouble feel free to email me at tod@todthomson.com or ask me on Twitter.
What follows is heavily sourced from Julian Thilo’s guide.
Git and GitHub (for Windows)
Because we are going to version our source code and content with Git, “backup” our site to GitHub and host our site on GitHub Pages, we need to have some elementary understanding of Git and GitHub. Please read a beginner’s guide to using Git on Windows and the GitHub Guide “Hello World” if you are not familiar with both.
I really like GitHub for Windows (and you might like it too) so if you don’t currently have a Git environment installed go ahead and install this now.
Node.js
If you want to be able to use CoffeeScript
for your scripts then you will need to download and install Node.js
as Jekyll will use Node.js to compile your .coffee script files.
If you don’t want CoffeeScript support then you can skip this step.
If you use Node.js make sure to add it to your path.
Python and Pygments
If you are a software developer you will probably want to include code snippets in your blog posts.
GitHub Pages runs Jekyll in --safe mode which means that your only option today is
to use Pygments the Python generic syntax highlighter
which is included “out of the box” on GitHub Pages.
-
Download and install Python 2.7.x (make sure to add Python to your path as part of the installation).
-
Open a new command prompt (so you will get Python in your path) and run
python -m pip install Pygmentswhich will install the syntax highlighter.
Do not use Python 3.x as it is known not to work with Pygments.
If you are hosting on your own server or will pre-generate your “compiled” blog locally and push the completed product to GitHub then you could use the pure-Ruby generic syntax highlighter Rouge. Just check the list of supported languages and lexers if you are planning to blog about archaic or fringe languages.
Ruby and the Ruby DevKit
Jekyll is written in Ruby so you will need Ruby if you want to do Jekyll. The Ruby DevKit is required as Jekyll has dependencies that are wrappers around C programs.
-
Download and install the latest RubyInstaller for your version of Windows.
I installedrubyinstaller-2.1.5-x64.exeas I’m on 64-bit Windows. -
Download the Ruby DevKit matching the version of Ruby you installed above.
I downloadedDevKit-mingw64-64-4.7.2-20130224-1432-sfx.exe. -
Extract
DevKit-mingw64-64-4.7.2-20130224-1432-sfx.exetoC:\RubyDevKit. -
Locate the
Ruby 2.0.0-p598-x64folder in the Windows Start Menu and openStart Command Prompt with Ruby. -
cd c:\RubyDevKitand runruby dk.rb initwhich will create the DevKit configuration fileconfig.ymlwhich you will use to point the DevKit at your Ruby installation. -
Edit
C:\RubyDevKit\config.ymladding- C:/Ruby21-x64to the last line of that file. Yes the/should be a forward slash. -
Run
ruby dk.rb installwhich will install the DevKit.
But before we try to install Jekyll let’s make sure everything is working.
Confirm Prerequisites
To avoid problems down the road we are going to confirm that all the prerequisites have installed correctly.
Here we will use Git Shell (MINGW32) that comes with GitHub for Windows providing the
whichcommand. If you don’t have something that provides thewhichcommand you won’t be able to complete these steps.
-
Open (or close and reopen) Git Shell.
-
Confirm Node.js is installed and is in your path by running
which nodewhich should produce/c/Program Files/nodejs/node. -
Confirm Python is installed and is in your path by running
which pythonwhich should produce/c/Python27/python. -
Confirm Ruby is installed and is in your path by running
which rubywhich should produce/c/Ruby21-x64/bin/ruby.
If any of the above steps didn’t yield the expected results then you will need to work out what has gone wrong before continuing. Feel free to email me at tod@todthomson.com or ask me on Twitter if you get really stuck.
Installing Jekyll
OK so we are (finally) up to the point where we can actually install Jekyll! Huzzah
If you try to
gem install jekyllnow you will notice that you get an SSL error. To fix that error follow the steps described here.
-
You should now be able to
gem install jekyllsuccessfully. Please be patient as it will look like nothing is happening for a very long time. -
Navigate to
C:\Ruby21-x64\lib\ruby\gems\2.1.0\gems\jekyll-2.5.3\lib\site_templateand edit_config.ymladdinghighlighter: pygmentsto the bottom of that file. -
Run
gem install wdmto install the Windows Directory Monitor package. This package will allow you to watch your blog post files for changes and recompile them automatically. The commandgemis used to interact with RubyGems the package management system for Ruby. -
Create a temporary directory
c:\BlogTest. We will use that directory to test that Jekyll is working. Runcd c:\BlogTestto change to that directory. -
Next run
jekyll new .which should scaffold a basic Jekyll site for you. -
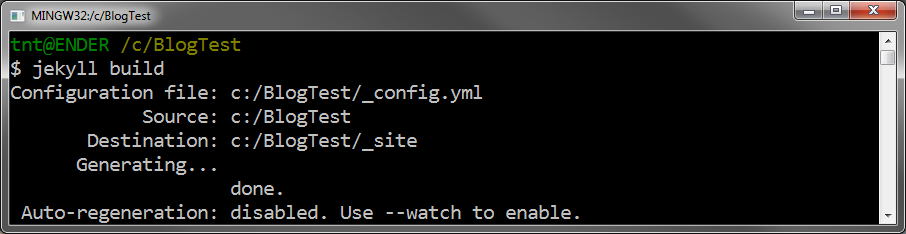
Now run
jekyll buildand you should see the following output.
Testing Jekyll
Next we are going to test to make sure that our blog scaffold generated correctly and that we can preview our blog locally.
Run jekyll serve to recompile the blog and host it in the WEBrick
web server.
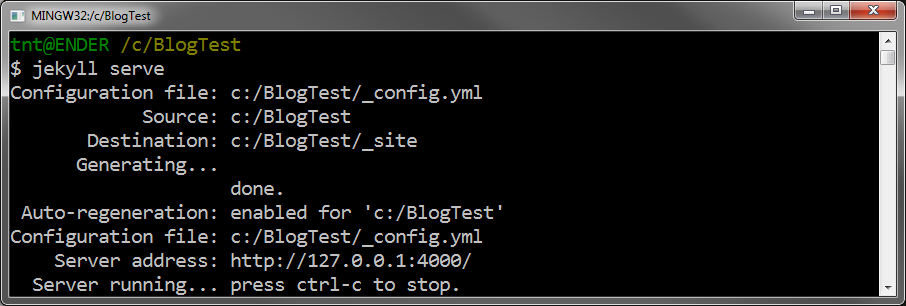
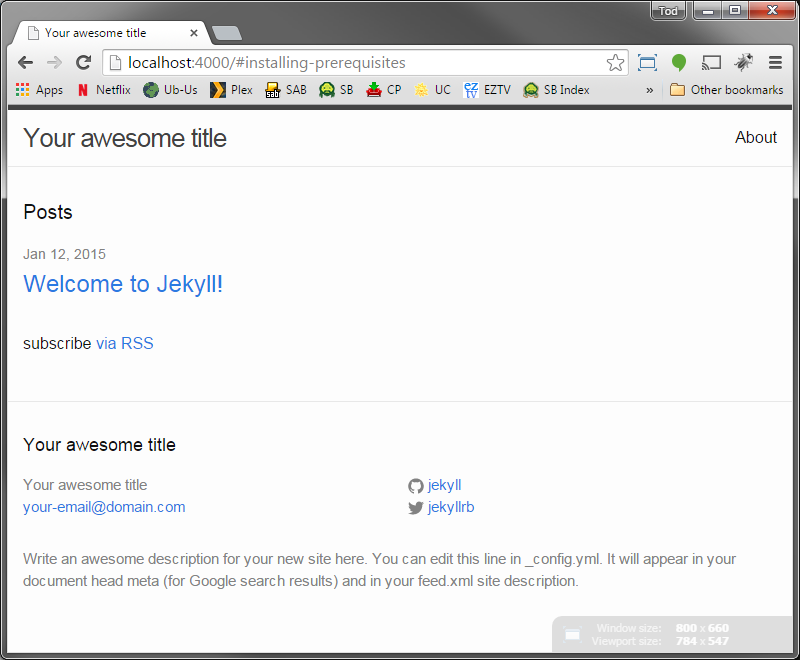
Browse to http://localhost:4000 and you should be able to see your blog.
You will need to
CTRL+Cto send the SIGINT signal to close the process.
Pygments vs Rouge
As I have already talked about Pygments is the default syntax highlighter used in GitHub Pages and if we weren’t hosting our blog on GitHub Pages we could use the pure-Ruby syntax highlighter Rouge.
The default _config.yml generated when you run jekyll new . looks like this.
# Site settings
title: Your awesome title
email: your-email@domain.com
description: ""
url: "http://yourdomain.com"
twitter_username: jekyllrb
github_username:  jekyll

# Build settings
markdown: kramdown
highlighter: rouge
As you can see Jekyll now defaults to highlighter: rouge.
We will need to change that to highlighter: pygments for our blog to work on GitHub Pages.
You can delete
c:\BlogTestnow you have confirmed Jekyll is working.
Hosting on GitHub Pages
Now you have the basic skeleton of a blog you can set up hosting on GitHub Pages.
-
Run
gem install bundlerto install Bundler the package bundle manager. -
Run
gem install github-pagesto install the support package. -
Run
gem install redcarpetto install Redcarpet a Ruby Markdown-parser. -
Follow these instructions to set up a repository and hosting for your new blog.
-
Check your site is working at
http://username.github.io.
It may take up to 30 minutes to become live so you might need to move on and come back to this step later…
Update “All the Things”!
There are some known bugs (on Windows) in some packages we’re dependant upon
so you might like to run gem update to make sure all your packages are up to date before continuing.
You will need to be very patient as this will take an eternity.
If you get the following error then keep re-running
gem updateuntil it completes successfully.
ERROR:  While executing gem ... (Gem::RemoteFetcher::FetchError)
    bad response Service Unavailable 503
    (https://api.rubygems.org/api/v1/dependencies?gems=rake)
Level up your Blog with Poole and Hyde
That’s great Tod but I want my blog to look awesome…
So you want your blog to look a little better than just the default Jekyll theme? As I mentioned earlier there are loads of cool themes out there you can choose from. It didn’t take me long to find something that I really liked that should be easy to modify to suit my needs.
Poole was designed and developed by @mdo to provide a clear and concise foundational setup for any Jekyll site. It does so by furnishing a full vanilla Jekyll install with example templates, pages, posts, and styles.
Hyde is a brazen two-column Jekyll theme that pairs a prominent sidebar with uncomplicated content based on Poole.
All you need to do to get going to start with an empty folder and clone either Poole or Hyde into it. Then you just hack away at the template partials and CSS etc until you get something you’re happy with.
The layout and styling you see here is based on Hyde.
Coda
I really hope you find this blog post useful. It might seem at first that there is a lot to do to get your blog set up with Jekyll, but it’s worth it as the end product is very transparent and easy to hack on.
Feel free to drop me a line or a tweet if you have any feedback, suggestions or if anything doesn’t work for you as described. I’m more than happy to help.
Until next time…. Make Mine Jekyll!